Unboxing and Installing the Elevated Sensors' Bed Occupancy Sensor for Home Assistant
As a home automation enthusiast, I get giddy when I find a new smart gadget that can elevate comfort and functionality in my space. One of the recent additions I've been excited about is a bed occupancy sensor. This nifty device helps track whether someone is using the bed or not, allowing for automated actions in Home Assistant.
In this post, I’ll take you through the unboxing and installation process of my new bed occupancy sensor, the Elevated Sensors Bed Presence Mk1, and how you can integrate it into your Home Assistant setup.

What is a Bed Occupancy Sensor?
A bed occupancy sensor detects whether someone is in bed, typically using motion or pressure detection. The Elevated Sensors Bed Presence Mk1 uses pressure detection for single or double "occupancy" beds. This data is useful for automating routines or monitoring sleep patterns – adding convenience to your smart home.
Unboxing the Sensor
Let’s get started with the unboxing. Here’s what you can expect to find inside the box:
- Bed Occupancy Main Unit: The main device that will be placed under your mattress – it connects to the pressure sensor strips and contains an ESP32 chip plus pins etc.
- Pressure Sensor Strips: Depending on your model, one or two pressure sensor strips. The dual variant includes short pin extension cords for larger beds like a King-size.
- Mounting Accessories: The box includes a wood screw and a square of double-sided tape to attach the main unit to your bed slats. The sensor strips have adhesive backing, but I used scotch tape to attach them to the slats.
- Online Installation Manual: Detailed instructions on how to set up the sensor and connect it to your smart home system are available online.
- Opening the box, everything was neatly packaged with a 3D printed insert. I made sure to check that nothing was damaged before moving forward.


Installation Process
Placement
The first step is deciding where to place the sensor. These sensors work best under the mattress in a position where they can detect the presence of a person without false negatives. In my case, I placed it under the mattress at about chest level, or 5 slats down from the top.

Clean the Surface
Ensure the surface where the main unit and sensors will be placed is clean and dry. This will ensure a strong bond for any adhesive mounts.
Install the sensor
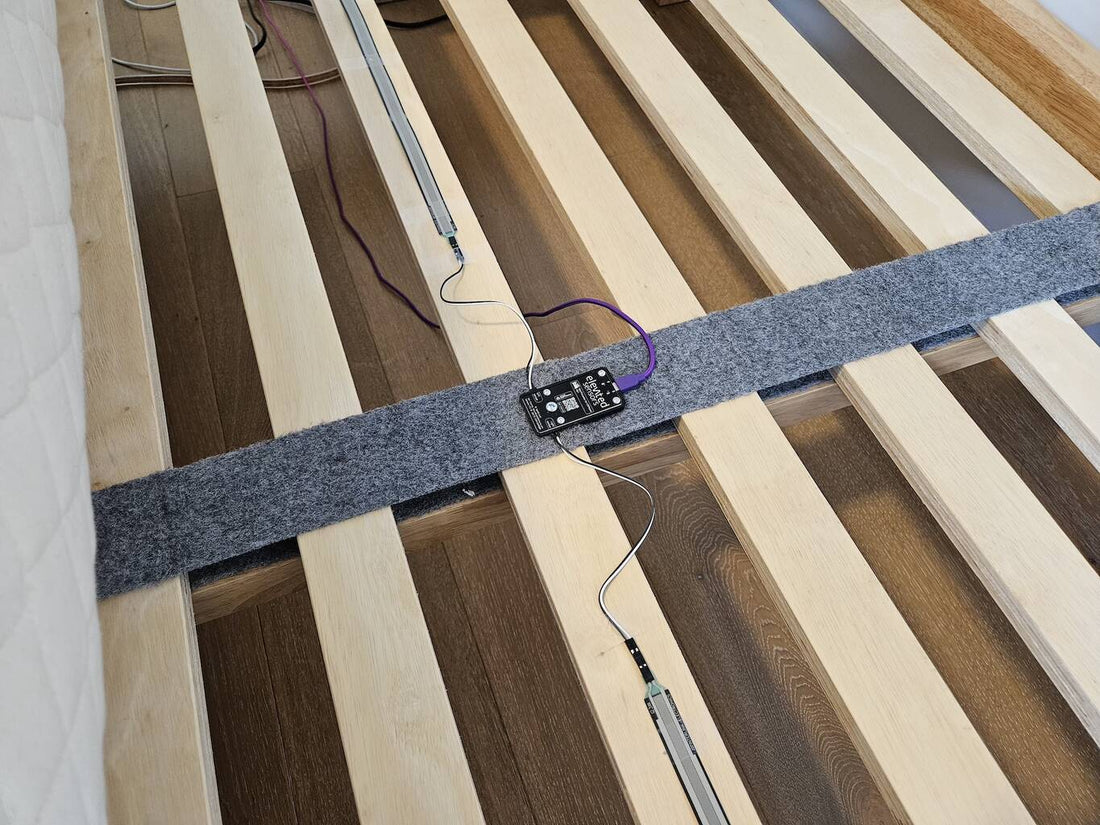
- Secure the main unit in place. The Elevated Sensors Bed Presence Mk1 package comes with both a 3M adhesive tile and a wood screw. I chose the latter because the adhesive would have been less reliable on my fuzzy slat connectors.

- Place the pressure sensor strips on the bed slat and connect them (optionally with the additional extension wires) to the main unit.
For a California King sized bed, I was happy to have the extensions included in the package. The same would be necessary for a King sized bed to ensure the pressure sensor strips are centered on each side of the bed where people are most likely to lay.

- The pressure strips have adhesive backing, but I just used scotch tape in three spots per strip to hold them in place. You might have to experiment with the placement of the strips but everything worked on the first try for me.
Connect the Power
- The device is powered via USB-C. Connect it to a power source nearby. Depending on the size of your bed and the position of the next outlet, it's good to have a long USB-C cable handy.

- I routed the cable over and under the next bed slat toward the side of the bedframe, and then used more scotch tape to route it to the head end of the bed where my power outlet is.
- Since this is an ESP32 with a WiFi module, the power draw would likely be too high to run this sensor off a battery pack without recharging frequently. I'd love to see a Zigbee version of this device, but changing batteries under your mattress would probably be annoying one way or another.

Connect to Home Assistant
- With the sensor powered on, connect your phone or laptop to the "bed-presence-xxxxxx" WiFi network.
- Open a web browser and navigate to http://192.168.4.1.
- Select the WiFi network you would like the device to use and save its password. The device will reboot and connect to your WiFi.
- Open Home Assistant and go to the “Integrations” section under "Settings" -> "Devices & Services".
- Home Assistant should have discovered your sensor as "Bed Presence xxxxxx".
- Press "Configure" followed by "Submit" to add the sensor to Home Assistant.
- Once connected, you should see a new device with several new entities created for your sensor.


- Calibrate each side of the bed by getting in and out and pressing the respective calibration buttons in Home Assistant's device interface. You might have to experiment what an "unoccupied" bed looks like depending on how many pillows, duvets etc you use.
Automate
Now comes the fun part!
With the bed occupancy sensor integrated, it’s time to set up automations. For example, you could create an automation that turns off the lights when you get into bed or triggers a morning routine when the sensor detects everyone has left the bed for X minutes.
I created another boolean helper entity called "everyone in bed" that is true when the number of people at home (tracked by the state of zone.home) is equal to the number of people in bed (binary_sensor.bed_occ_either or binary_sensor.bed_occ_both). This then makes it easy to e.g. arm and disarm the door alarm at night and in the morning without any manual interaction and while avoiding accidental alarm triggers.
My Experience So Far
The bed occupancy sensor has been a welcome addition to my smart home. I’ve already set up several automations, such as turning off the bedroom ceiling lights and adjusting alarm and sleep state settings based on whether or not someone's in bed. It adds a layer of comfort and precision to my routines that I had to work around before with sensitive but still inaccurate mmWave presence sensors or other state tracking helpers.
Unfortunately I have run into some sensor issues a couple of times in firmware version 2025.2.0. Twice the sensor correctly claimed that binary_sensor.bed_occ_either was Detected, but both binary_sensor.bed_occ_his and binary_sensor.bed_occ_hers were Clear. That's a logical impossibility, but I have seen it twice already. Another time I was in bed with the pressure indicator clearly showing so at 100% Calibrated Pressure, but binary_sensor.bed_occ_his still was Clear. In both cases a quick "out of bed and back in" fixed the sensor states, but it seems like there may be a rare bug in the firmware.
Final Thoughts
Installing the Elevated Sensors Bed Presence Mk1 bed occupancy sensor was a straightforward process that adds a new dimension of precision to any home automation setup. Not only can it enhance comfort, but it can also optimize smart home routines in ways you may not have imagined or been able to do yet. I'm very happy with the product and think it provides great value for the price – as of Feb 2025 it's $69.99 for the Queen/King version and $54.99 for the Single version.
Despite minor glitches, I’m glad I added the Elevated Sensors Bed Presence Mk1 to my home automation setup!


